Is your Moen handheld showerhead not providing you with the decent flow of water it previously was? This drop in pressure of the Moen showerhead could be due to a clogged flow restrictor or a low flow of water from bathroom pipes.
In both cases, you may need to remove the flow resistor of the showerhead to solve the issue. Remember, removing a flow resistor may increase the water pressure, but it can result in the non-conservation of water. This change can cost you to pay high water bills.
Take extra care while removing the showerhead from the shower arm because it contains some highly delicate parts if lost or damaged, which can result in a costly replacement.
Without further ado, let’s dive in to learn how to remove a flow restrictor from Moen handheld shower head.
How Do I Remove A Flow Restrictor From a Moen Handheld Shower Head?
Removing a flow restrictor is a straightforward process and can be done easily without complications. We have explained the process in a step-by-step guide below so you can understand them thoroughly. Let’s take a look at them.
Step 1. Required Tools
Tools play a major role in making your DIY tasks a breeze. Mentioned below are the tools you need to gather before following the process.
- Soft cloth
- Adjustable wrench
- Screwdriver
- Plumber or Teflon tape
A soft cloth will help to provide a solid grip while holding or protection against scratches. An adjustable wrench will also contribute to this step while helping to hold a connector pipe easily.
The screwdriver will be used to fix the flathead, and plumber tape will further assist in fixing the showerhead or save the threads from collapsing later.
Step 2. Precautionary Measures
Here are some preventive measures that you must take care of while removing a flow restrictor.
Turn off the water supply from the tap:
It is a recommended practice to help you complete the process easily. Turning on the water while removing the restrictor will do no favor but will result in making your task more complicated. So, turn off the shower water supply before starting.
Try to use a lightweight wrench:
A lightweight wrench is easy to carry and will help you efficiently hold the connector pipe and showerhead. Do consider this one before getting your hands dirty.
Two brains are better than one:
If possible, try to get a partner with yourself when operating the showerhead. Having an extra person standing by your side will help you gain confidence and manage the process better while continuing the steps.
Take your time:
Removing a flow restrictor is not a process you can expect to be done in a matter of minutes. If you’re doing it for the first time, it will take more time than usual to complete. So, don’t rush to finish the work in a few minutes.
Note: If you find it difficult to remove the flow restrictor from the showerhead. We recommend hiring an expert to get the job done. The showerhead is sensible; you may damage it whimsically.
Step 3. Detach The Showerhead
Now it’s time the follow the process of removing the flow restrictor from the Moen showerhead. First, you have to detach the showerhead from the connector or hose.
You need to get a soft cloth and wrap it around the showerhead to give you a solid grip. On the other hand, take a wrench and fix it on the area where the head is connected to the hose.
Now, turn the wrench in an anti-clockwise direction to easily disassemble the head. Be careful when you’re turning the threads of the showerhead. Detach the showerhead
Step 4. Carefully Take O-ring Gasket
Once the showerhead has been removed, you will now see an O-ring Gasket attached to the showerhead’s neck. You have to take it out using your finger. You can remove it with the help of a screwdriver, but as it is a sensitive object, we recommend taking it out with your hands.
Remove the gasket and separate the screen attached to it. Shake the screen; it will make it fresh. After that, adjust it again with the rubber O-ring Gasket in your hands.
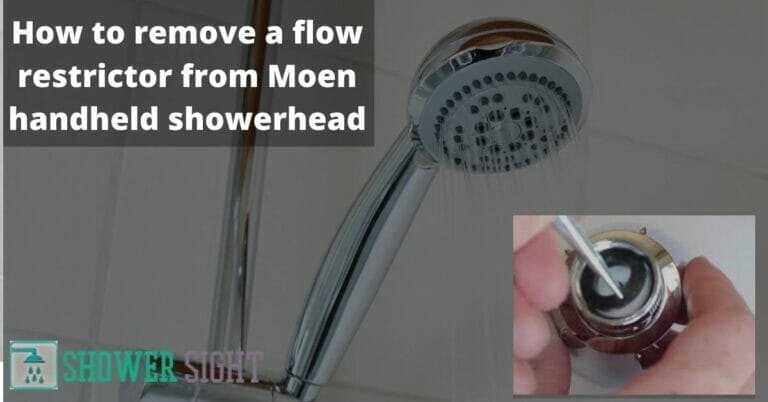
Step 5. Remove the Flathead Screw
Once you have removed the rubber O-ring Gasket, you can easily spot the flathead screw where the flow restrictor is attached. This screw is the main hurdle in taking out the flow restrictor successfully. So, it should be removed first to remove the flow restrictor easily.
Remember the screwdriver you gathered? Use it to remove the flathead screw easily. This flathead screw is made of plastic with different perforations in it. It will help you to recognize it.
Step 6. Separate The Flow Restrictor:
Now comes the main task of removing the flow restrictor from the showerhead. Use the screwdriver again to remove the flow restrictor gently. You have to pay much attention when taking out the flow restrictor.
It has multiple minuscule threads in it, so if you remove it fast, this may cause damage to it. After you have done this task, you’re so near to accomplishing the process.
Step 7. Put Back Screen and Gasket:
Once the flow restrictor is removed, you have to follow the reverse of the process you did above. First, you have to insert the screen back just as it was before.
Make sure you have cleaned the screen properly before inserting it back. Any kind of negligence in this regard may result in water pressure issues.
Similarly, insert the O-ring Gasket back in the previous position. Ensure it is properly aligned with the screen to ensure smooth water flow.
Step 8. Attach the showerhead:
Remove the previously applied plumber’s tape from the shower arm. After that, wrap around the new one to cover the entire thread area of the shower arm.
Once you’ve done this, carefully put the showerhead back into it just as it was before when you disassembled it. Be careful of threads, as they’re sharp and can result in some serious cuts and injuries.
Step 9. Fix the showerhead to the connector:
Now, take the cloth to hold the connection and valve tightly. The next step is to thread the pipe with the connection. Remember not to thread the pipe more than 3 quarters.
Use the wrench to tighten the showerhead. Make sure not to use the wrench so hard, as it may break the pipe or connector. Be smooth and gentle with the tools.
Step 10. Turn on the showerhead:
The last step is to turn on the water supply of the showerhead to check for any leakage or damage. If everything is alright, you’re good to go. You might see a considerable improvement in water pressure flow from the showerhead.
With that said, nothing can stop you now from having a peaceful and comfortable high-pressure shower from your Moen handheld showerhead.
You May Also Like: How To Remove Flow Restrictor From Delta Shower Head
Do I replace the flow restrictor instead of removing it?
If you think removing the flow restrictor can result in a non-conservation of water or an increase in water bills, you can replace it instead of removing it. Replacing a clogged flow restrictor is a considerable decision since it helps you save water as well as slightly improve showerhead water pressure.
Therefore, you need to follow the steps mentioned above to do the replacement. But before putting back the O-ring Gasket and screen:
- You will need a brand new flow restrictor which you can replace with the worn-out one.
- Do the replacement by placing the new one in the position of the old one.
- Insert the flathead screw again to fix the new restrictor before placing the screen and rubber ring.
What are the pros and cons of removing the flow restrictor from the showerhead?
Pros:
- It increases the water pressure flow of the showerhead to an extreme level.
- It gives you a choice to use the water according to your desire.
- You can freely use all spray settings of the showerhead.
- The showerhead pressure will not decrease even if it’s receiving low-flow water from pipes.
- It will enhance your shower-taking experience.
Cons:
- Removing the flow restrictor will result in the non-conservation of water.
- It will lead to an increase in water wastage and water bills.
- If you’re a resident of the US, you may break the law if the showerhead produces more than 2.5 gallons per minute.
How should I Decide whether I replace or remove the flow restrictor from the shower head?
The flow restrictor is the main component of the shower system. It helps to save water but, at the same time, decreases the water flow rate of the showerhead.
If the water pressure coming out of your bathroom pipes is extremely low, we recommend removing the flow restrictor instead of replacing it.
On the other hand, if the water pressure of bathroom pipes is stable, but still the showerhead is not providing a decent flow of water, we recommend replacing the flow restrictor.
This is because the low flow of water is due to a clogged flow restrictor. Or, instead, you can remove it if it still fails to provide desired results. Ultimately, it’s your decision to make, keeping your needs in mind.
Final Word
Removing a flow restrictor may look to be a bit daunting task, but once you get your hands dirty, it becomes no more than a piece of cake. To make your task a breeze, we’ve described everything you need to know about how to remove a flow restrictor from Moen Handheld Shower Head in this article.
We recommend reading it two or three times to understand the process better. Be careful not to injure yourself or others while following the process.
We hope you like our article. If yes, do check other interesting posts on our blog. If you have any questions please, write them below in the comment section; I would love to answer them.
Read More: How To Remove Shower Head That is Glued On